Tuesday, September 17, 2013

DIY: Turn A Cotton Dress into an Apron


I bought this little green polkadot dress years ago. It was $4 on a discount rack. I thought it was cute and couldn't pass up a $4 dress. Except, it was a little too cutesy. I never wore it. So it ended up in a garbage bag in the basement with other discarded clothing, destined for a garage sale. Until, I realized with just a tiny bit of alterations, this cotton dress would be an adorable apron, so I rescued it from it's garage sale future. 


The first thing I did was cut out the zipper so the dress could open up and lay flat.


The white ribbon was originally tacked on to the dress so that it would tie on the side, so I removed the tack. When I'm done, I wanted the ribbon to tie in the back, not the side. I drew with pencil on the inside of the dress (yeah, couldn't find my fabric marker...) where I wanted to cut away the sides of the dress and a simple "U" shape seemed to do the trick. I made sure to keep the spaghetti straps attached.


Fold under all raw edges and pin.


Pin Pin Pin... Honestly, the pinning took more time than anything else. It was all pretty simple. 


Remove the extra "flap" on the back. Fold under the raw edges and pin all the way down the long seam for the back.


Sew! The sewing is very simple, nothing to be remotely intimidated about, trust me. This would be a great beginner sewing project... it's that easy. If you really can't sew a straight line, I'm sure a fabric glue would work as well, but nothing beats the finish on the sewing machine.


Once all of the raw edges are sewn I attached the white ribbon again. Only tacking it in place on the seam in the back. Don't forget to go over it a couple times to reinforce your apron ties.


And that's it! Seriously, you are already done! Now it's time to bake homemade cookies in a cute new apron. 


I can't wait to check out some vintage dresses the next time I'm at the thrift store. Wouldn't a vintage dress make an adorable apron!? I can't wait. Please share your Dress into an Apron projects with me, I'd love to see them.

Wednesday, April 10, 2013

The Stuff I Don't Know What To Do With

Ok, I'll admit something... sometimes I pick items up at thrift stores and I have NO clue what I'm going to do with them. Really random things I don't have a purpose for and I don't know why but I KNOW I need it. Sometimes these thrift store finds end up sitting in my basement for a little while, until I finally realize the perfect use for them. Like this vintage tripod. I bought it at the Salvation Army and really didn't know why I wanted it. There was just something about the look of it that felt like my style.  I got it home and then realized it was destined to be a floor lamp!


With a tiny bit of work it became this!

Here's the problem, I have a few things sitting in the basement and I still need a little inspiration. I suppose some of them could just be quirky home decor items that haven't found the right place yet, but really, most of these need a little creativity. Things like these:

Vintage fabric from Hawaii...

A Bull Horn...

 4 Green, Vintage Metal Drawers...


Yep, that's some pretty random stuff, huh? Do you have any thrift store finds that you didn't quite know what to do with? Do you hang on to them until inspiration strikes, too?

Friday, April 5, 2013

Candlestick Cupcake Stand Tutorial


I love this project because it uses two things I see all the time a thrift stores: two glass plates and a brass candlestick. This even works with an over embellished and sad looking candlestick like this one! I mean seriously, the poor thing is a few plastic crystals short of a set...


Brass candlesticks work so well to make a cupcake stand because they have a secret to them, something you may not realize... Most brass candlestick holders do this:


They come apart! How awesome is that?! I don't think most people would know that these things are screwed together in a few places. It makes removing that beaded silliness easier. Basically, for this project all I had to do was drill holes in the glass plates and then reassemble it. Score! I love simple DIY jobs that don't look like they were simple to do. 

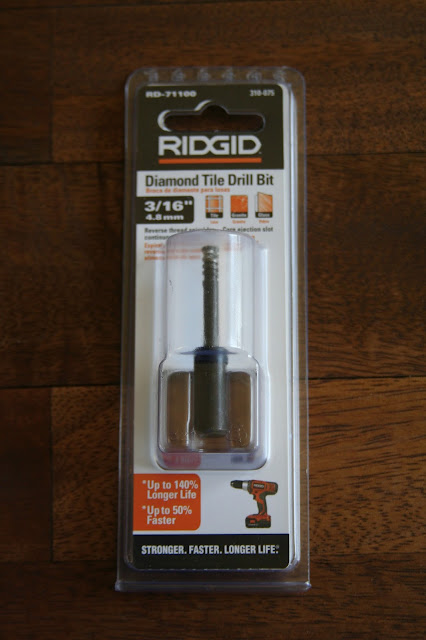
This project was my first attempt at drilling through glass. If the idea of drilling a hole in a glass plate sounds a little scary, don't worry, it's not hard at all! I had to purchase a special drill bit that is specifically made for glass and ceramic. They aren't cheap but it's worth it to have the right tools for the job.


While using this drill bit, I had to keep the surface of the glass wet, so I would drill for a little bit and then add some water, drill for a little bit and then add some water. You get it. I  begin drilling the hole, holding the drill at a 45 degree angle until it began to cut a groove in the glass. Then, I slowly moved the drill into a 90 degree angle (straight up and down) until I was all the way through the glass. Making sure to add water as I was drilling.


The trickiest part for me was because I bought a drill bit that was a tad too small. I spent too much time trying to make the hole wider with the drill bit so that it would fit on the screws in the candlestick. It eventually worked, but it would have been much easier to have just purchased the correct size in the first place...


To cushion the glass between the metal, I picked up these Neoprene Rubber Washers from Home Depot. This will keep the glass from chipping or cracking against the metal candlestick where they are screwed together. After all that work I would hate to assemble it and crack the glass! I had to trim down the washers so that it doesn't show in the assembled cupcake stand. For the top piece of glass I actually had to take a razor blade and cut a washer in half so it was less thick and could be reassembled. Ya gotta do what ya gotta do.


Here are a few assembly shots:


Now all I needed to do was figure out how to cover up the top where there is a large candlestick-sized hole. I had a few different ideas but ended up going with a glass door pull from World Market and glued it in place. It was the perfect finishing touch to the cupcake stand and makes it look antique and expensive!


I just love it! This would make such a great handmade gift or house warming present. And what a great excuse to make some cupcakes. Yum! Now there is a new purpose for all of those brass candlesticks you see at thrift stores!


Tuesday, March 26, 2013

Braided Rope Rug

I have to admit, this rope rug is more like a braided rope indoor/outdoor mat because it is heavy duty and would be a little pokey on bare feet. It just was a little simpler calling it a "Braided Rope Rug" rather than a "Braided Rope Indoor/Outdoor Floor Mat". Right? I suppose if you use a softer rope or fabric, you could totally make a rug! 
I started with 200 feet of 1/4 rope. Cut the rope into three equal lengths and braid them together into one long piece. Secure the ends with a rubber band or something to keep it from unraveling on you.


You will definitely want to work on a flat surface. I like to sit on the floor and work, although I know that's not for everyone I just like to have lots of room. Put a dab of hot glue on the end of the rope to keep it from unraveling and to hold it in place as you start. Begin to coil the rope a little, making sure the braid is flat. Use the twine to tie a knot on the underside of the rug to hold it in place. About every inch or so weave together two loops, trying to keep your "stitches" consistent. Pull the twine tight so the braid doesn't have any gaps, but not too tight that it buckles or doesn't lay flat.


Keep going, weaving the twine through the braid. If you run out of twine simply tie a knot on the underside of the rug and start with a new piece of twine.


When you reach the end of the braid, carefully hot glue the ends together and tuck it under the edge, trying to keep the rug as round as possible. Secure the end with the twine. 


That's it! So simple. 100 feet of 1/4 inch rope makes a small mat measuring 19 inches across. 200 feet of rope makes a 23 inch round matt. I decided to dye the finished rug a little darker so it wasn't so tan and new looking. It would also be fun to dye a bright color, but I wanted to keep it neutral.

Few more photos of the finished mat! (Ignore the crazy scratched up hardwood floors... they are a project for another day...)


Tuesday, March 19, 2013

How to Whitewash Wood

I have a new favorite thing. Yes, I have a tendency to get slightly obsessed with something for a short time and overload on it. Usually it's cheese fries or ice cream, but this week, it's the super simple DIY technique of whitewashing. Maybe you have noticed my past two projects involved an element of it? I love this technique because not only is it crazy simple, trust me, anyone that can hold a paint brush can do it, but also because the results are spectacular.


Remember this chair?


If it was painted a solid color it would have an entirely different feel. The chair would have been too clean and crisp looking. I wanted to highlight the history of this chair, it was more than 100 years old after all, and embrace the fact I didn't pick it up brand new at a furniture store last week. This is why I knew I wanted to whitewash it. Whitewashing gives the appearance of being worn and weathered, as if it's been left out in the back yard, propped up against the shed and forgotten about for a few years.

Here's what you do. Seriously, there is no reason to be intimidated because this process is so easy and I'm going to share all my awesome secrets with you.

I love the look of whitewashed wood, so I usually do this technique on unpainted, wooden items, although it is possible to do it on an item that has been painted a color as well. The first step is to prepare the surface of the item, in this case, it means slightly roughing up the varnished surface of the wood with 150 grit sand paper.


Sand in the direction of the wood grain. Use a damp rag to wipe off all the dust. You aren't sanding the finish off, just scuffing it up and removing the shine.


Mix traditional latex paint with water. 1 part paint to 2 parts water, it's ok to eyeball it because the measurements don't need to be exact. Keep in mind, a little bit goes a long way. Brush on the paint/water mixture, working in small sections at a time in the direction of the woodgrain. Let it sit on the wood a few seconds and very lightly, with a paper towel wipe the paint in the same direction as the woodgrain, too. You aren't trying to remove all of the paint, just a little, leaving the "woodgrain" lines. Let it dry completely and do additional layers if needed.


Once you build up the layers to the desired finish you may want to very lightly sand with 150 grit sandpaper over the surface to smooth out any rough spots. Make sure you use a damp rag to remove the dust again. You can either leave the finish like it is or do a clear coat to protect it. That's it! See, not too tough!


Just remember, you aren't going for a flawless finish or even consistency. The point is to make it look worn and aged. Let a little of the wood peek through and even experiment with lightly sanding the whitewashed wood to bring it out a little bit more. Have fun with it. If you are still intimidated, test out whitewashing on a few scrap pieces or a cheap garage sale find to build up your confidence.