Tuesday, March 26, 2013

Braided Rope Rug

I have to admit, this rope rug is more like a braided rope indoor/outdoor mat because it is heavy duty and would be a little pokey on bare feet. It just was a little simpler calling it a "Braided Rope Rug" rather than a "Braided Rope Indoor/Outdoor Floor Mat". Right? I suppose if you use a softer rope or fabric, you could totally make a rug! 
I started with 200 feet of 1/4 rope. Cut the rope into three equal lengths and braid them together into one long piece. Secure the ends with a rubber band or something to keep it from unraveling on you.


You will definitely want to work on a flat surface. I like to sit on the floor and work, although I know that's not for everyone I just like to have lots of room. Put a dab of hot glue on the end of the rope to keep it from unraveling and to hold it in place as you start. Begin to coil the rope a little, making sure the braid is flat. Use the twine to tie a knot on the underside of the rug to hold it in place. About every inch or so weave together two loops, trying to keep your "stitches" consistent. Pull the twine tight so the braid doesn't have any gaps, but not too tight that it buckles or doesn't lay flat.


Keep going, weaving the twine through the braid. If you run out of twine simply tie a knot on the underside of the rug and start with a new piece of twine.


When you reach the end of the braid, carefully hot glue the ends together and tuck it under the edge, trying to keep the rug as round as possible. Secure the end with the twine. 


That's it! So simple. 100 feet of 1/4 inch rope makes a small mat measuring 19 inches across. 200 feet of rope makes a 23 inch round matt. I decided to dye the finished rug a little darker so it wasn't so tan and new looking. It would also be fun to dye a bright color, but I wanted to keep it neutral.

Few more photos of the finished mat! (Ignore the crazy scratched up hardwood floors... they are a project for another day...)


Tuesday, March 19, 2013

How to Whitewash Wood

I have a new favorite thing. Yes, I have a tendency to get slightly obsessed with something for a short time and overload on it. Usually it's cheese fries or ice cream, but this week, it's the super simple DIY technique of whitewashing. Maybe you have noticed my past two projects involved an element of it? I love this technique because not only is it crazy simple, trust me, anyone that can hold a paint brush can do it, but also because the results are spectacular.


Remember this chair?


If it was painted a solid color it would have an entirely different feel. The chair would have been too clean and crisp looking. I wanted to highlight the history of this chair, it was more than 100 years old after all, and embrace the fact I didn't pick it up brand new at a furniture store last week. This is why I knew I wanted to whitewash it. Whitewashing gives the appearance of being worn and weathered, as if it's been left out in the back yard, propped up against the shed and forgotten about for a few years.

Here's what you do. Seriously, there is no reason to be intimidated because this process is so easy and I'm going to share all my awesome secrets with you.

I love the look of whitewashed wood, so I usually do this technique on unpainted, wooden items, although it is possible to do it on an item that has been painted a color as well. The first step is to prepare the surface of the item, in this case, it means slightly roughing up the varnished surface of the wood with 150 grit sand paper.


Sand in the direction of the wood grain. Use a damp rag to wipe off all the dust. You aren't sanding the finish off, just scuffing it up and removing the shine.


Mix traditional latex paint with water. 1 part paint to 2 parts water, it's ok to eyeball it because the measurements don't need to be exact. Keep in mind, a little bit goes a long way. Brush on the paint/water mixture, working in small sections at a time in the direction of the woodgrain. Let it sit on the wood a few seconds and very lightly, with a paper towel wipe the paint in the same direction as the woodgrain, too. You aren't trying to remove all of the paint, just a little, leaving the "woodgrain" lines. Let it dry completely and do additional layers if needed.


Once you build up the layers to the desired finish you may want to very lightly sand with 150 grit sandpaper over the surface to smooth out any rough spots. Make sure you use a damp rag to remove the dust again. You can either leave the finish like it is or do a clear coat to protect it. That's it! See, not too tough!


Just remember, you aren't going for a flawless finish or even consistency. The point is to make it look worn and aged. Let a little of the wood peek through and even experiment with lightly sanding the whitewashed wood to bring it out a little bit more. Have fun with it. If you are still intimidated, test out whitewashing on a few scrap pieces or a cheap garage sale find to build up your confidence.


Saturday, March 16, 2013

Add Contrast To Freshen Things Up!

I was tired of this hallway. Wouldn't you be? It's an ugly hallway. The walls were painted the faintest color of green you can imagine, the door is boring and that sconce? A bit dated. This super easy hallway facelift primarily involved paint, and not much of it! I did this entire project with 4 sample size paint colors from Home Depot that you can buy for less than $3 each! What a difference a little paint can make! 


Here are a few more of the before shots. (Sorry for some of the crazy angles, it was an awkward corner at the top of the stairs to take photos.)


And a few more "After" shots:


New light I made out of a $.50 wooden bowl from Salvation Army!


I white washed the door which gave it a great texture and used less paint.


In my next post I'll share all of my white-washing secrets! It's also the same finish I did on this antique chair.  It's amazing how much better a boring hallway can look with a little bit of paint! How do you like to add contrast to a boring space? Feel free to share in the comments!

Jen

Saturday, March 9, 2013

How To Reupholster an Antique Chair

I loved the results of this reupholstered chair so much, I just had to talk about it!


One of my favorite things is hitting up garage sales and thrift stores because you just never know what you are going to find. It feels like treasure hunting and it makes my heart race when I lock eyes with that perfect new "thing" I just have to have.

Enter stage left: this garage sale beauty.


Yes, she has a bit of a "muffin top" and she's not the prettiest shade of yellow-beige I've ever seen, but the red flashing lights and "project!" alarm bells were going off in my head. This chair was going to be my first reupholstering project! I paid $20 and couldn't wait to go shopping for new fabric right away.

Only, the thing sat in a corner of my kitchen for 2 years. 2 years in it's sad, frumpy state. Enough was enough. It was project time!

I started by removing the fabric trim and upholstery fabric. When millions of little (and still very sharp) nails came spilling out in the process, I decided it was an "outside" project and worked on the front porch as long as I could. It was February in Michigan, after all!


The second layer of padding in this chair was actually horse hair! Scratchy, pokey horse hair. Definitely an antique, but this meant I would need to redo the padding and webbing, completely gutting the chair. It's nice if you can keep the original padding in the piece because that stuff is expensive! After all of the fabric, padding, horse hair, springs and webbing were removed it looked like this. No turning back now.


I removed the zillions of little nails from the chair, which took a couple hours...  and gave the wood a white wash finish rather than paint it. I wanted it to still have an "aged" feel while keeping it modern and stylish. The white wash finish was perfect, creating a lovely weathered look. I was now ready to start the webbing which makes up the structure of the chair. The webbing can be purchased at most fabric stores and is about $.80 a yard. I needed 6 yards for this chair. Using a staple gun, I stapled the webbing to the edge of the chair. Make sure it is pulled tightly without damaging the structure of the chair. I did 3 rows closely together side by side in the base of the chair. Then I wove each horizontal strip between the first ones I did, so it started to look like this: 


It should look like a basket, alternating if the strap goes over the first one or under, if that makes sense? I did the same thing to the backrest of the chair as well. I used a lot of staples to make sure that sucker was secure. Staple, staple, staple, staple....

Next up I cut and fit the foam for the seat and two pieces for the backrest of the chair (one for the front and one for the back). I went slowly, using a box cutter knife to carve out the right shape to fit around the armrests and curve in the front. (Notice the clutter from all of the foam in the background? I tend to make a mess as I work...) I then upholstered the chair in muslin, pulling the fabric taught so there were no bumps and stapling it in place. If the seat of the chair was a clock, I stapled at 12 and then 6, followed by 3 and nine and kept working back and forth all the way around the entire seat. When it was secure I did the same thing with the front and back of the backrest. Next I whipped out the upholstery fabric and did the same thing. (It helps to keep the old fabric and use it as a pattern to know how big to cut the pieces in the new fabric, just make sure to make it at least couple inches larger on each side to have room to hold the fabric while stretching it!)


Trim the fabric off very close to the edge. At this point I made the double piping that is glued on to cover up the staples and make the edges look all fancy. I followed this tutorial on how to sew the piping, which was actually pretty simple to do. The final step was to hot glue on the piping. 


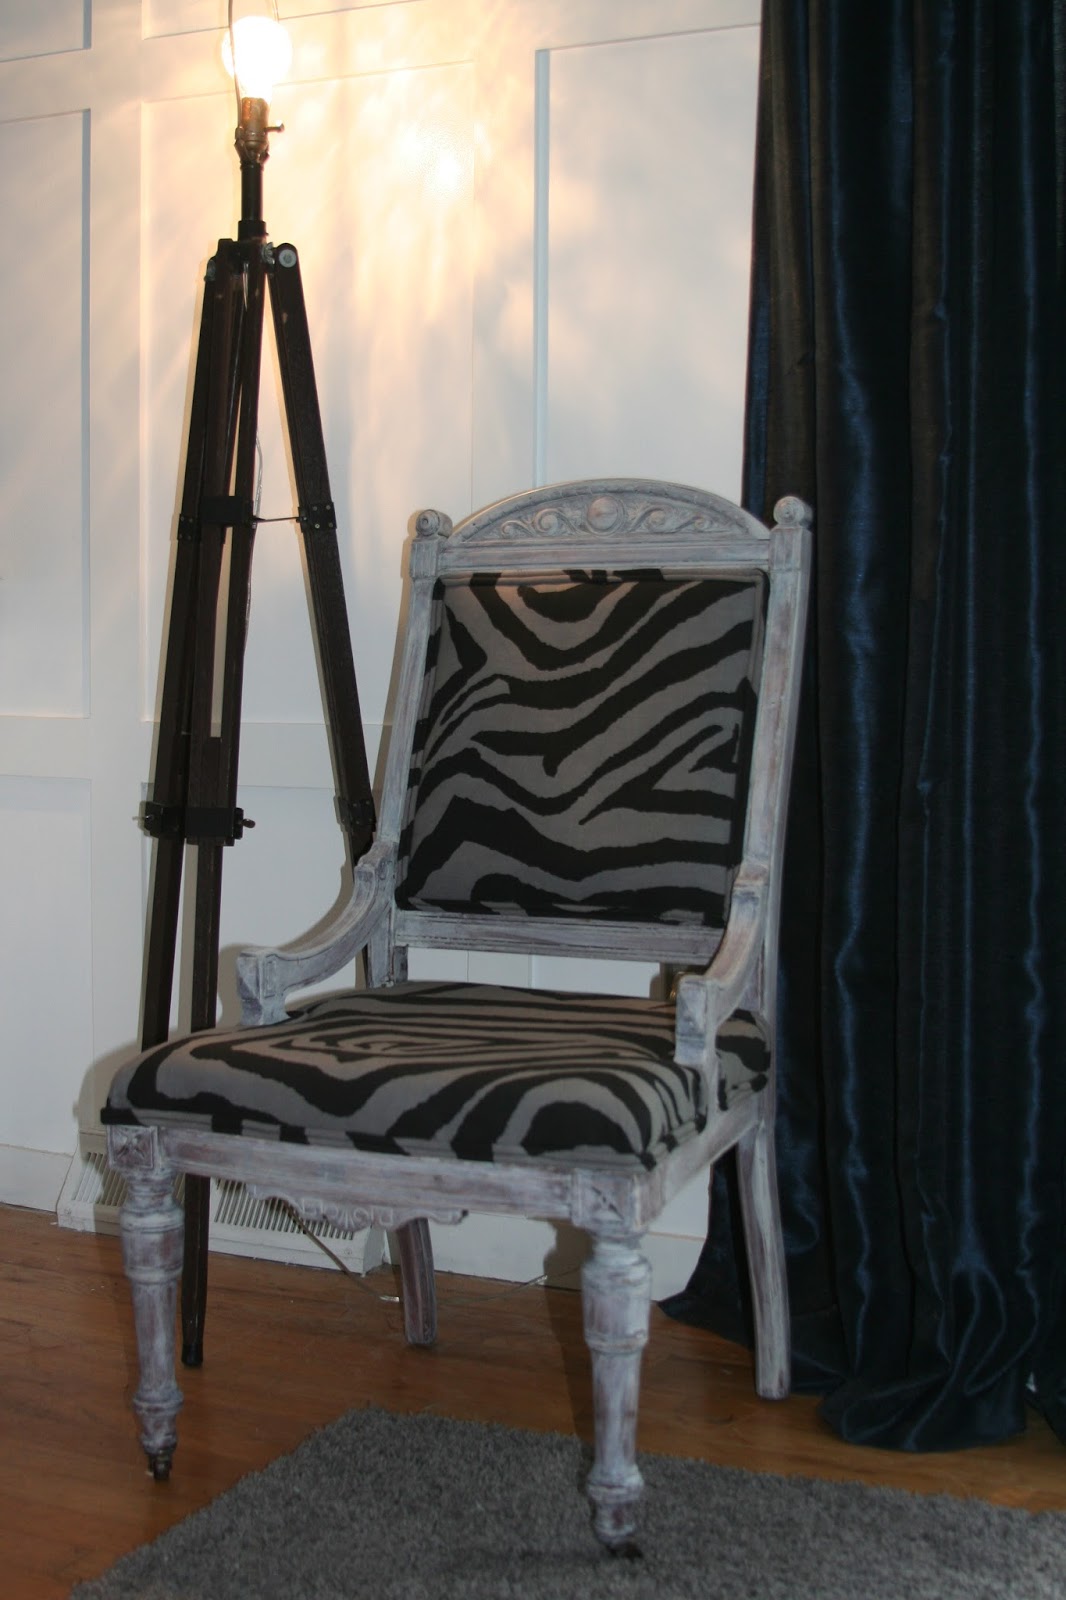
I am so happy with how this project turned out! It is no longer an overstuffed, toasted marshmallow and it's beaming with character. I love the combination of the worn, white wash finish and the clean, crisp fabric pattern, it creates a contrast that gives the chair so much personality and sass! If you have an ugly chair you contemplated redoing, don't put it off any longer, it is a fun project with HUGE results!