I loved the results of this reupholstered chair so much, I just had to talk about it!
One of my favorite things is hitting up garage sales and thrift stores because you just never know what you are going to find. It feels like treasure hunting and it makes my heart race when I lock eyes with that perfect new "thing" I just have to have.
Enter stage left: this garage sale beauty.
Yes, she has a bit of a "muffin top" and she's not the prettiest shade of yellow-beige I've ever seen, but the red flashing lights and "project!" alarm bells were going off in my head. This chair was going to be my first reupholstering project! I paid $20 and couldn't wait to go shopping for new fabric right away.
Only, the thing sat in a corner of my kitchen for 2 years. 2 years in it's sad, frumpy state. Enough was enough. It was project time!
I started by removing the fabric trim and upholstery fabric. When millions of little (and still very sharp) nails came spilling out in the process, I decided it was an "outside" project and worked on the front porch as long as I could. It was February in Michigan, after all!
The second layer of padding in this chair was actually horse hair! Scratchy, pokey horse hair. Definitely an antique, but this meant I would need to redo the padding and webbing, completely gutting the chair. It's nice if you can keep the original padding in the piece because that stuff is expensive!
After all of the fabric, padding, horse hair, springs and webbing were removed it looked like this. No turning back now.
I removed the zillions of little nails from the chair, which took a couple hours... and gave the wood a white wash finish rather than paint it. I wanted it to still have an "aged" feel while keeping it modern and stylish. The white wash finish was perfect, creating a lovely weathered look. I was now ready to start the webbing which makes up the structure of the chair. The webbing can be purchased at most fabric stores and is about $.80 a yard. I needed 6 yards for this chair. Using a staple gun, I stapled the webbing to the edge of the chair. Make sure it is pulled tightly without damaging the structure of the chair. I did 3 rows closely together side by side in the base of the chair. Then I wove each horizontal strip between the first ones I did, so it started to look like this:

It should look like a basket, alternating if the strap goes over the first one or under, if that makes sense? I did the same thing to the backrest of the chair as well. I used a lot of staples to make sure that sucker was secure. Staple, staple, staple, staple....
Next up I cut and fit the foam for the seat and two pieces for the backrest of the chair (one for the front and one for the back). I went slowly, using a box cutter knife to carve out the right shape to fit around the armrests and curve in the front. (Notice the clutter from all of the foam in the background? I tend to make a mess as I work...) I then upholstered the chair in muslin, pulling the fabric taught so there were no bumps and stapling it in place. If the seat of the chair was a clock, I stapled at 12 and then 6, followed by 3 and nine and kept working back and forth all the way around the entire seat. When it was secure I did the same thing with the front and back of the backrest. Next I whipped out the upholstery fabric and did the same thing. (It helps to keep the old fabric and use it as a pattern to know how big to cut the pieces in the new fabric, just make sure to make it at least couple inches larger on each side to have room to hold the fabric while stretching it!)


Trim the fabric off very close to the edge. At this point I made the double piping that is glued on to cover up the staples and make the edges look all fancy. I followed this
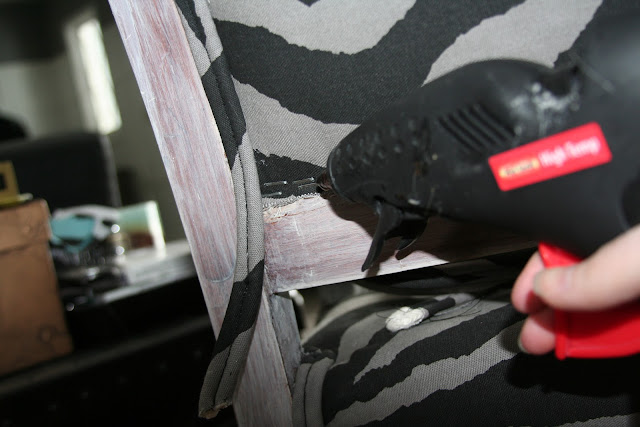
tutorial on how to sew the piping, which was actually pretty simple to do. The final step was to hot glue on the piping.
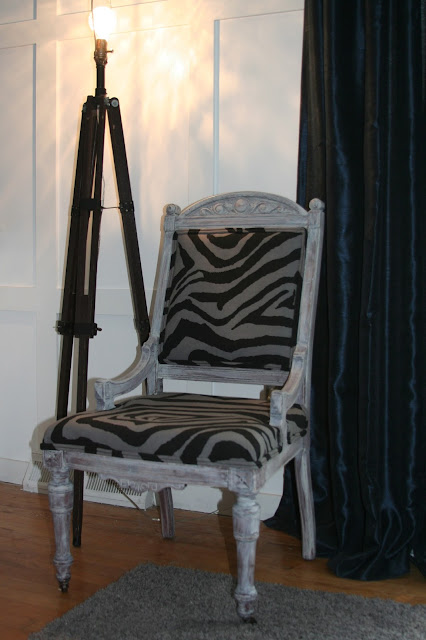
I am so happy with how this project turned out! It is no longer an overstuffed, toasted marshmallow and it's beaming with character. I love the combination of the worn, white wash finish and the clean, crisp fabric pattern, it creates a contrast that gives the chair so much personality and sass! If you have an ugly chair you contemplated redoing, don't put it off any longer, it is a fun project with HUGE results!
 I have to admit, this rope rug is more like a braided rope indoor/outdoor mat because it is heavy duty and would be a little pokey on bare feet. It just was a little simpler calling it a "Braided Rope Rug" rather than a "Braided Rope Indoor/Outdoor Floor Mat". Right? I suppose if you use a softer rope or fabric, you could totally make a rug!


